
Let’s be honest, a flat product backlog is about as inspiring as a spreadsheet. It’s a long, overwhelming list of features, tasks, and fixes without any real narrative. You know what you need to build, but do you really understand why? Or for whom? This is where user story mapping comes in, and it’s a total game-changer.
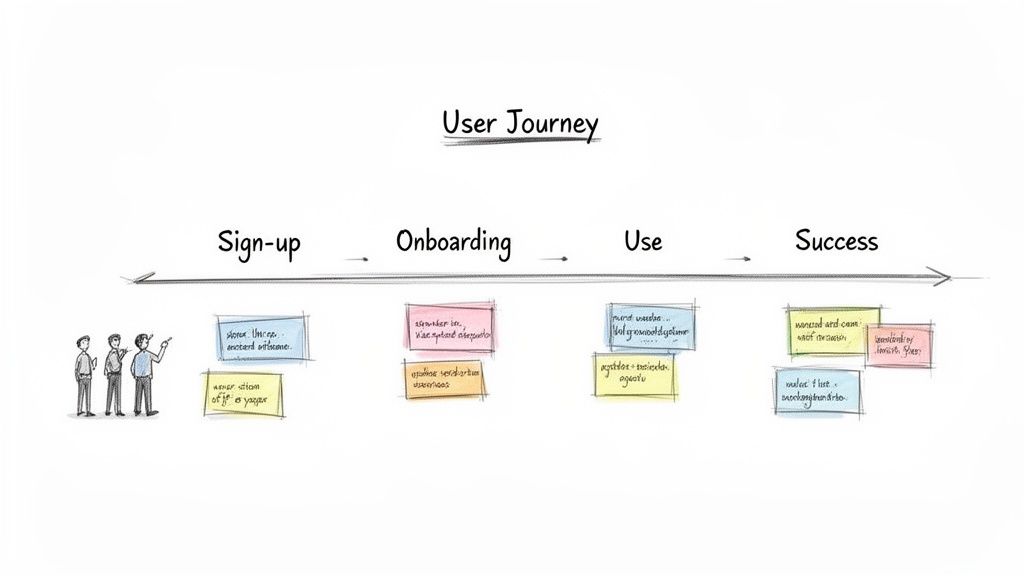
Instead of just listing features, user story mapping is a visual exercise that lays out the entire journey a person takes with your product. It’s about telling their story, from the moment they sign up to the moment they achieve their goal. It forces you to think from the user’s perspective, making sure every single thing your team builds is tied directly to a real human need.
Visualising the Customer Journey
Think about planning a road trip. A traditional backlog is your shopping list: “buy snacks,” “book hotel,” “get petrol.” Sure, all those things need to happen, but the list gives you zero context. When do you need the snacks? Where is the hotel? It’s just a jumble of tasks.
A user story map, on the other hand, is the actual map of your trip. It shows the whole journey laid out chronologically. The big stages—like “Prepare for Trip,” “Drive Day 1,” and “Explore the City”—form the top row, the backbone of your adventure.
Beneath each of those big stages, you’d place sticky notes for the smaller steps: “Pack Bags,” “Load Car,” “Drive to First Stop,” and “Check into Hotel.” Suddenly, you have a two-dimensional view that provides the critical context a flat list could never offer. It tells a story that makes sense.
The Anatomy of a Story Map
For a SaaS product, this road trip analogy maps perfectly to the user experience. A story map organises everything a user does into a clear, logical flow. This helps your team see the entire landscape instead of just staring at individual trees. It’s a powerful technique that embodies the core principles of great Agile Methodology Best practices.
A typical map has a brilliantly simple structure:
- Backbone: These are the high-level activities that make up the user’s journey. Think of them as the major scenes in their story: Sign Up, Set Up Profile, Create First Project, Invite Team.
- User Stories: These are the specific tasks and steps that happen within each backbone activity. Under Create First Project, you might have stories like: Name the project, Choose a template, or Upload initial data.
- Release Slices: Imagine drawing horizontal lines across your map. These lines group stories into logical releases, helping you carve out your Minimum Viable Product (MVP) and plan what comes next.
By laying out the entire workflow visually, your team can instantly spot gaps, dependencies, and opportunities you’d otherwise miss. It turns the fuzzy idea of “user needs” into a tangible, actionable plan.
This visual approach does more than just help with planning; it sparks conversation. It gets everyone—from developers and marketers to the founders—on the same page, all focused on delivering a cohesive and genuinely valuable user experience from day one.
User Story Mapping vs Traditional Backlogs
To really see the difference, let’s put the two side-by-side. One is a list; the other is a story.
| Aspect | Traditional Backlog (Flat List) | User Story Map (2D Grid) |
|---|---|---|
| Structure | A single, linear list of tasks (e.g., Jira backlog). | A two-dimensional grid showing user activities and tasks over time. |
| Context | Lacks user journey context. “Why” is often lost. | Provides a holistic view of the user’s experience from start to finish. |
| Prioritisation | Prioritised by urgency or business value, often in a vacuum. | Prioritised by what delivers a complete, valuable slice of the journey. |
| Collaboration | Often managed by a single product owner. | A collaborative tool for the entire team to build shared understanding. |
| Visibility | Easy to lose sight of the big picture. Low-priority items get buried. | Gaps and dependencies are immediately obvious. Everyone sees the whole story. |
While a traditional backlog has its place for managing tasks, a user story map is far superior for understanding what to build and why. It ensures you’re always building a coherent product, not just a collection of disconnected features.
Why This Matters to Lean SaaS Founders
If you’re a lean SaaS founder, every single decision you make is a high-stakes bet. You’re working with limited time and even more limited cash, which means you absolutely cannot afford to build features that nobody wants. This is where user story mapping stops being just another “agile practice” and becomes your strategic unfair advantage.
Its real magic is in creating a powerful shared understanding. Even in a small, fast-moving team, it’s shockingly easy for developers, marketers, and founders to end up working in their own little bubbles. A story map smashes those silos. It creates a single, visual source of truth that lays out the entire customer experience for everyone to see. Suddenly, everyone gets how their piece of the puzzle fits into the bigger picture, ensuring the team is aligned not just on what to build, but why it matters.
Get Your Team Thinking Like a User
It’s a classic trap: you fall in love with your own clever technical solutions and completely lose sight of the customer’s actual problem. User story mapping forces you to stay relentlessly focused on the user’s point of view. By framing every single task as a step in a user’s journey, you stop your backlog from turning into a dry list of technical chores.
This user-first approach is baked right into the process. You’re constantly asking questions like:
- What is the user really trying to do at this stage?
- What’s the quickest path to their “aha!” moment?
- Does this feature actually make their life easier, or are we just adding clutter?
This shift in mindset is non-negotiable if you want to find product-market fit. It keeps your development efforts aimed squarely at solving real-world problems—the only reliable path to sustainable growth. This deep customer empathy is the heart and soul of continuous product discovery.
Prioritise for Maximum Impact
For a bootstrapped founder, this might be the biggest win of all: story mapping makes prioritisation ridiculously simple. It gives you the perfect framework for surgically slicing out a Minimum Viable Product (MVP) that delivers a complete, valuable experience from day one—even if it’s a tiny one.
You stop asking, “What features should we build?” and start asking, “What’s the smallest version of the whole story we can deliver to solve one core problem?” This is a fundamental shift that helps you ship faster and learn sooner.
This approach saves you from the all-too-common pitfall of building a bunch of half-finished features that don’t connect. By drawing a simple horizontal line across your map, you define a release that delivers a coherent, end-to-end workflow. You can then confidently push everything below that line to a future release, knowing you have a solid plan without compromising the integrity of your first launch.
Across Southeast Asia’s buzzing SaaS scene, this method has become a go-to for agile founders. Indie hackers pushing out multiple products a year have found that visualising user journeys this way can slash development time by up to 30%. It’s this ruthless focus on a streamlined user experience that led to HappyPanda’s famous 10-minute setup, helping turn the region’s army of digital SMEs into product-led growth stories. You can find more on this trend by reading about the rise of SaaS in Southeast Asia.
Alright, we’ve covered the “why.” Now for the fun part: the “how.” This is where we stop talking theory and start building something tangible that will actually shape your product.
To make this feel real, let’s walk through the whole process with an example any lean SaaS founder can appreciate.
Imagine you’re building a simple but powerful tool: an AI-powered social media scheduler. It’s designed for busy solopreneurs who need to get a week’s worth of content scheduled in minutes, not hours. Let’s map it out together.
Step 1: Frame the Core Goal
Before you even think about touching a virtual sticky note, you need to nail down the problem you’re solving. What’s the ultimate outcome your user is chasing? This isn’t about features; it’s about the transformation you’re promising.
For our scheduler, the goal is crystal clear: Help solopreneurs schedule a week of high-quality social media content in under 15 minutes.
That’s it. This single sentence becomes your north star. Every idea, every story, every feature you add to the map has to serve this goal. If it doesn’t, it’s just noise you can’t afford right now.
Step 2: Define Your User Persona
Who are you building this for? You can’t tell a good story if you don’t know your main character. A simple user persona helps you step into their shoes and see the world through their eyes. No need for a 10-page dossier—just enough detail to build a little empathy.
Let’s meet our user:
- Persona: “The Overwhelmed Content Creator”
- Bio: A classic solo business owner who’s juggling everything. They know social media is important but find it a soul-crushing time sink.
- Pain Points: Struggles to post consistently, runs out of ideas, and spends way too much time staring at a blinking cursor.
- Goal: Wants to maintain a slick, professional social media presence without it becoming a full-time job.
Keeping this persona in mind ensures you’re solving real problems for a real person, not just building a generic “user” tool.
This diagram shows how a founder can align their team around user needs and prioritise the most important features first.
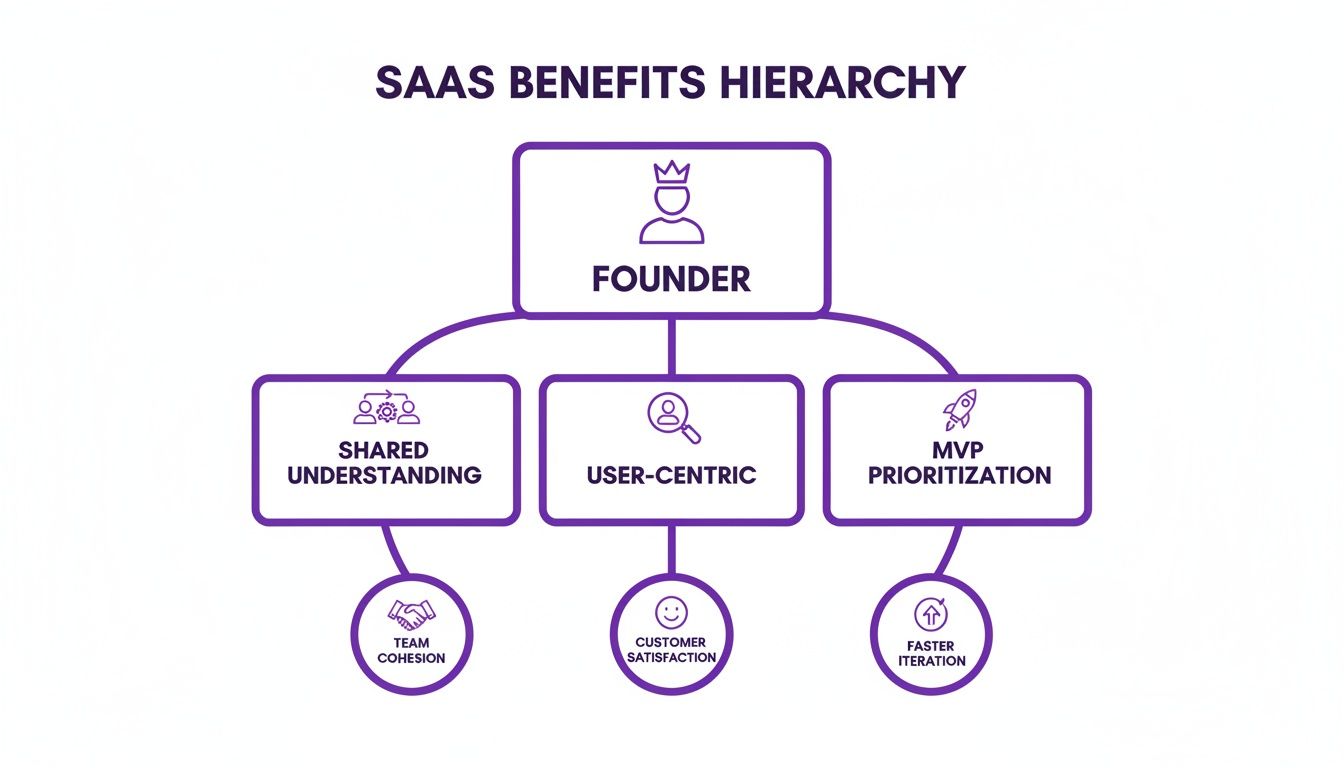
This structure ensures that every decision flows from a shared understanding of the user, leading to a focused and valuable MVP.
Step 3: Build the Backbone
The backbone is the big-picture view of your user’s journey. Think of it as the main chapters of their story, laid out chronologically from left to right across the top of your map. These are the high-level activities they perform to get from A to B.
For our AI social scheduler, the backbone is pretty straightforward:
- Connect Accounts: The first hurdle. Getting their social profiles hooked up.
- Create Content: The core creative engine of the whole operation.
- Schedule Posts: Getting everything lined up and ready to fly.
- Analyse Performance: A quick look back to see what actually worked.
This simple sequence tells the entire story of using the product. It gives you a solid frame to hang all the finer details on.
Step 4: Flesh Out the Body
Okay, the skeleton is in place. Now it’s time to add some meat to those bones. The “body” of the map consists of all the specific user stories (or steps) that live under each of those backbone activities. You’ll arrange these vertically in columns under their parent.
This is where you can get the team together and brainstorm. Think through every little action the user has to take to get through each phase of their journey.
Here’s how we might flesh out our map:
- Under “Connect Accounts”:
- Authenticate with Twitter
- Authenticate with LinkedIn
- View connected accounts
- Under “Create Content”:
- Write post text manually
- Generate caption with AI from a prompt
- Upload an image
- Select a stock photo
- Under “Schedule Posts”:
- Select date and time
- Add to queue for optimal timing
- View scheduled posts in a calendar
- Under “Analyse Performance”:
- View basic engagement metrics (likes, comments)
- See top-performing posts
Suddenly, you have a two-dimensional grid that shows not just what the user does, but the entire flow of their experience. The whole product becomes instantly understandable at a glance.
Step 5: Prioritise and Slice for Releases
This is the moment of truth, especially for a lean founder. Your map probably has a ton of great ideas on it now, but you can’t build them all at once. It’s time to get ruthless with prioritisation.
Go through each column and re-order the stories vertically. The absolute must-haves go at the top; the nice-to-haves sink to the bottom. Your goal is to identify the thinnest possible slice that still delivers a complete, end-to-end journey for the user.
The power of user story mapping lies in slicing. By drawing a horizontal line across your map, you define a release. Everything above the line is your MVP; everything below is for a future version.
For our scheduler, the first slice—our MVP—might look something like this:
- Release 1 (MVP): Authenticate with Twitter, Write post text manually, Upload an image, Select date and time, View scheduled posts.
This slice creates a complete, working product. A user can connect an account, write a post, add a picture, and schedule it. It’s basic, but it solves the core problem. The fancy AI features, LinkedIn integration, and detailed analytics can all wait for Release 2. This focus gets you to market faster, letting you learn from real users before you pour more time and money into the next phase.
Connecting Your Story Map to Customer Feedback
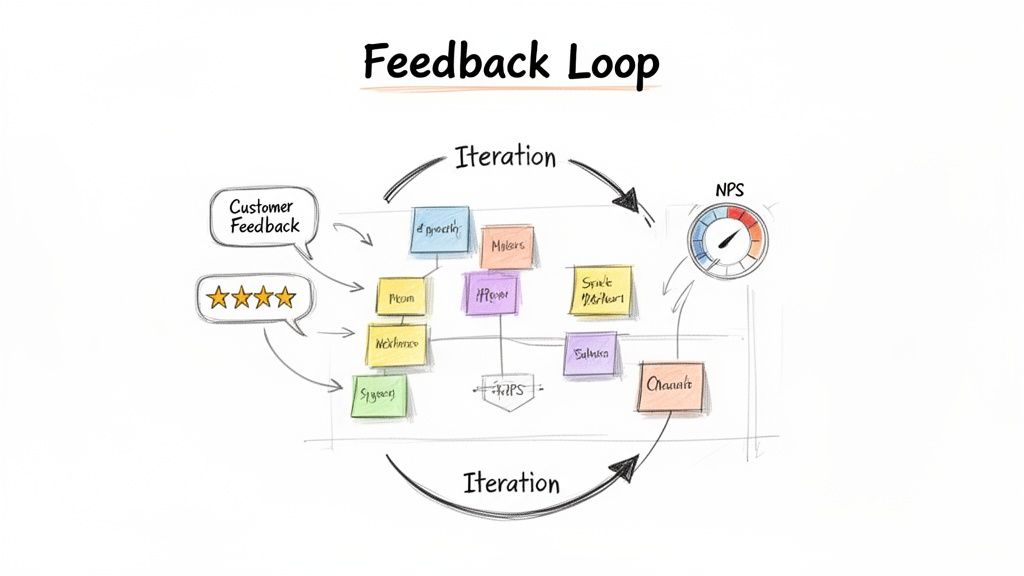
A user story map isn’t a museum piece you frame and admire. If it’s not changing, that’s a sign your product isn’t growing. The sharpest SaaS founders I know treat their story map as a living, breathing document—one that’s constantly fed by real customer insights.
Think of it as the engine for a powerful feedback loop.
Without that loop, your beautifully organised map is just a collection of your own best guesses. Connecting it directly to the voice of your customer transforms it from a static plan into a dynamic reflection of reality. It keeps your roadmap honest and aligned with what people actually need.
From Feedback to Actionable Stories
Every piece of customer feedback is a potential new story or a much-needed tweak to an existing one. The trick is building a system to translate raw feedback—whether it comes from a support ticket, survey, or a user interview—into the structured format of your map.
Imagine a user drops a support ticket saying, “I hate that I can’t find my old invoices.” That isn’t just a complaint; it’s the seed of a user story. Your job is to translate it into product-speak: “As a returning customer, I want to easily access my past invoices so that I can manage my accounting.”
Boom. This new story card can be slotted directly onto your map under a backbone activity like “Manage Account.” Now, that feedback is no longer just a ticket languishing in a helpdesk queue. It’s a visible part of the user’s journey, ready to be prioritised.
Using Metrics to Pinpoint Friction
Qualitative feedback is gold, but quantitative data tells you where to start digging. Metrics like Net Promoter Score (NPS) and Customer Satisfaction (CSAT) are brilliant for spotting friction points in the user journey.
Don’t just glance at your overall NPS score. Break it down by stages of the user journey. A low score from users who just finished onboarding is a massive red flag for that specific part of your map.
For instance, if you send a CSAT survey after a user first invites a team member and the scores are consistently low, you know exactly where the pain is. You can then dive into the “Invite Team” section of your map and prioritise stories that could simplify the workflow, clarify instructions, or fix a confusing UI element. This is the heart of closing the feedback loop and turning data into tangible product improvements.
A Practical Feedback Loop Example
Let’s walk through how this works for a bootstrapped SaaS. You’re getting whispers that your onboarding feels a bit confusing. Here’s the play-by-play:
- Collect Data: You notice a 15% drop-off rate during the “Set Up Project” phase of your onboarding checklist in HappyPanda. Ouch.
- Gather Context: You trigger a simple “How are we doing?” survey for users who stall at this step. The responses keep mentioning unclear terminology.
- Translate to a Story: You create a new user story: “As a new user, I want tooltips explaining technical terms so that I can set up my project confidently.”
- Place on the Map: This story gets placed high up in the “Onboard” column of your map, flagging it as a top priority for the next development sprint.
This simple process ensures that real user struggles directly inform your product priorities. This approach is transforming how small teams in Southeast Asia build customer-centric SaaS, especially with skyrocketing AI adoption. For $1k-$30k MRR teams, mapping reveals drop-offs in trial conversions, lifting completion by 35% with tools like progress checklists.
And to make sure that customer feedback is actually actionable, it’s crucial to understand how to write bug reports that developers actually read and can act on efficiently. This customer-first approach is helping social media creators grow 50% yearly by relying on AI tools mapped to genuine user needs, reflecting the high adoption of AI tools in the region.
Of course. Here is the rewritten section, crafted to match the human-written style of the provided examples.
Common Story Mapping Pitfalls and How to Avoid Them
Even the slickest techniques can go sideways if you’re not careful. User story mapping is brilliantly simple on the surface, but a few classic blunders can quickly turn a productive conversation into a confusing mess of sticky notes.
Knowing what these traps are is half the battle. Let’s walk through the big ones so you can dodge them like a pro.
Pitfall 1: Getting Bogged Down in the Weeds
This is the most common mistake by a long shot. The team gets excited, the creative juices start flowing, and suddenly everyone is brainstorming every tiny task, edge case, and “what if” scenario under the sun. Before you know it, the map is flooded with so much detail that you can’t see the forest for the trees.
The map stops being a strategic overview and becomes just another granular backlog. It’s cluttered, overwhelming, and frankly, a bit of an eyesore. At that point, it loses all power to guide the big-picture decisions.
The fix? Think in “zoom levels.” Start broad and stay broad for as long as you possibly can. Your first pass should be all about the high-level backbone—the major activities that make up the user’s journey. Don’t even let the conversation whisper the words “user story” yet.
Think of it like sketching a portrait. You start with the basic outline—the head, shoulders, and where the eyes and nose go. You wouldn’t dream of drawing individual eyelashes before you’ve got the core structure right. It’s non-negotiable.
Once that backbone is solid and everyone in the room is nodding along, then you can zoom in and start fleshing it out with the actual stories. This layered approach keeps the whole thing manageable and makes sure the map stays true to its purpose: being a strategic guide.
Pitfall 2: Mapping in a Silo
Here’s another classic error: a product manager locks themselves in a room, builds a beautiful story map, and then presents it to the team as a finished masterpiece. This completely misses the point.
The real magic of user story mapping isn’t the artifact you end up with. It’s the shared understanding your team builds while creating it together. It’s a conversation, not a monologue.
When just one person is calling the shots, you’re throwing away a goldmine of different perspectives:
- Developers can spot technical roadblocks from a mile away or suggest a much simpler way to get things done.
- Marketers know exactly which moments are critical for user activation and how to communicate value.
- Support staff are on the front lines; they know precisely where users get stuck, frustrated, or confused.
To avoid this, make mapping a team sport. Get people from every corner of the business in the same room (or virtual call). This collaborative jam session ensures the map is a true, holistic reflection of the user experience and gets instant buy-in from the people who will actually build, market, and support the product.
Pitfall 3: Treating the Map as a Sacred Text
Last but not least, teams often treat their first story map like it’s been carved into stone tablets. They build it, admire it, and then follow it blindly, turning a flexible guide into a rigid prison.
Here’s the truth: a story map is just a snapshot of your understanding at a single moment in time.
The second your first release goes live and real people start using it, that understanding is going to change. And your map needs to change with it. A story map should be a living, breathing document that evolves with every new piece of customer feedback, every data insight, and every shift in the market.
Make a habit of revisiting your map, especially before you plan your next sprint or development cycle. Ask yourselves: what have we learned from our users? How does that change the journey we’ve laid out? This keeps your strategy fluid and responsive, ensuring you’re always building what your users actually need, not just what you thought they needed three months ago.
Tools and Software for User Story Mapping
While there’s a certain old-school charm to a wall plastered with colourful sticky notes, let’s be honest—for remote teams and long-term planning, it’s just not practical. The right digital tool can take your user story map from a static, one-time exercise into a living, breathing hub for your entire product strategy.
But jumping into the tool market can feel overwhelming. You don’t need some clunky, enterprise-grade behemoth. For scrappy founders, the best options are flexible, affordable, and play nicely with the tools you already use. They should make collaboration feel effortless, not add another layer of complexity to your day.
Digital Whiteboards The Flexible Choice
For most teams, a digital whiteboard is the perfect place to start. Think of these tools as an infinite canvas where you can build your map exactly how you see it, without being boxed in by a rigid structure. They’re brilliant for those initial freewheeling brainstorms and workshops that are so crucial for getting everyone on the same page.
A couple of the big players here are:
- Miro: A powerhouse choice, known for its massive template library and robust features. It’s incredibly versatile—letting you create detailed story maps, flowcharts, and user personas all in one spot.
- Mural: Another fantastic option that really shines when it comes to facilitating collaborative workshops. Its features are tailor-made for guided sessions, making it easy to keep everyone focused and engaged during the mapping process.
These tools are the closest you’ll get to an in-person sticky note session, but they come with superpowers like version history, easy sharing, and slick integrations with project management software like Jira or Trello.
The real magic of a digital whiteboard isn’t just about making digital sticky notes; it’s about creating a permanent, shareable space where your product’s story can grow and evolve. It becomes the single source of truth that anyone can tap into, anytime.
Dedicated and Integrated Solutions
As your product scales, you might find yourself wanting a tool that’s more tightly woven into your development backlog. This is where dedicated or integrated solutions really come into their own, linking your high-level story map directly to the day-to-day tasks your engineering team is tackling.
- Jira (with extensions): On its own, Jira’s backlog is just a flat list. But with powerful plugins like Easy Agile User Story Maps or Miro’s own Jira integration, you can transform that list into a visual, two-dimensional map. This keeps your strategy and execution locked in sync.
- StoriesOnBoard: This is a purpose-built user story mapping tool. It does one thing and does it exceptionally well, offering a clean, intuitive interface for building maps, defining releases, and pushing stories straight into your development workflow.
Choosing the right software often boils down to your team’s existing habits. If you live and breathe Jira, an integrated solution is a no-brainer. If your process is a bit more fluid, a digital whiteboard gives you the creative freedom you need. The goal is to pick something that reduces friction, not adds another silo.
Ultimately, many of these platforms are also excellent additions to your suite of the best customer feedback tools, helping you visualise and act on those golden nuggets of user insight.
Answering the Tough Questions
Even the best-laid plans come with questions. When you’re rolling out a new process like story mapping, it’s natural for a few practical queries to pop up. Let’s tackle some of the most common ones we hear from founders and product teams.
Who Should Be in a Story Mapping Session?
Think of it like assembling a heist crew—you need a diverse set of skills to pull it off. The magic of story mapping comes from getting different perspectives in the same room (whether virtual or physical) to build a complete picture of the user’s journey.
Your ideal guest list should include:
- A Product Lead: This is the person steering the ship, the one who owns the product vision. In a small SaaS, this is often the founder.
- Developers/Engineers: You need them in the room for a reality check. They bring the crucial technical insights on what’s feasible and how much effort different ideas will take.
- A Designer (UX/UI): They’re the champion of the user experience, ensuring the visual flow and interactions make sense.
- Customer-Facing Reps: These are your people on the front lines—support or sales staff who hear about user pain points all day, every day. Their input is pure gold.
How Long Does a User Story Mapping Session Take?
This really depends on what you’re mapping. If you’re tackling a brand-new product or a massive feature, you’ll want to block out a good chunk of time. A half-day (3-4 hours) is a solid starting point. It gives you enough breathing room for brainstorming and deep conversation without everyone hitting a wall.
On the other hand, for smaller features or just updating an existing map, you can get it done in a much more focused 60-90 minute session. The trick is to keep the scope tight and know exactly what you want to achieve before you start.
How Often Should We Update Our Story Map?
Your story map isn’t a dusty artefact you create once and frame on the wall. Think of it as a living, breathing document. It needs to evolve as you learn more from your customers and as the market shifts.
A great rule of thumb is to review your story map before planning any major development cycle or sprint. This keeps your immediate priorities tethered to the bigger picture of the user journey.
Basically, any time you get a significant new insight, it’s time for an update. For instance, if you get a flood of customer feedback about a confusing feature, that’s your cue to revisit that part of your map immediately.
What Is the Difference Between a User Story and a User Task?
This one trips people up, but the distinction is subtle yet super important. A user story is all about the why—it focuses on delivering real, tangible value to the user. It usually follows that classic format: “As a [type of user], I want to [do something] so that [I get this benefit].”
A user task, however, is a specific, concrete step required to make that story a reality. It’s the “how.”
Let’s break it down with an example:
- Story: “As a writer, I want a spell checker so that I can avoid embarrassing mistakes.”
- Tasks: Design the UI for highlighting errors, Integrate a spelling library API, Build the ‘add to dictionary’ function.
Your story map is built from those value-driven user stories. The development team then takes those stories and breaks them down into actionable tasks.
Ready to turn customer feedback into a powerful, visual roadmap? HappyPanda brings your feedback, onboarding, and changelogs together, giving you the insights you need to build a user story map that truly reflects what your customers want. Start your free trial today.